
I have also cut out the pinafore thats in the pattern in the red cordoury. Its a nice pattern with lots of garment options for little girls from 9mths to 3yrs.




I have also cut out the pinafore thats in the pattern in the red cordoury. Its a nice pattern with lots of garment options for little girls from 9mths to 3yrs.
 I started the draft by drafting a basic skirt draft with no ease at the waist and 4cm ease included in the hip measurement. I made the draft to a length of 60cm which is at the bottom of my knee (I'm only short, about 159cm) and made the side seams straight. On the centre back of the draft 22cm above the hem I made a mark and on the princess seam 19cm above the hem I made another mark which I joined to the 22cm mark with a slight curve. This piece I then cut away and I slashed and flared it as in the diagram.
As my thighs are a little on the heavy side (read this as I am pear shaped, my fat sacks are on my bottom and my thighs) I added 0.5cm from the hip line down to the hem line. I also did a sway back adjustment on the back waistline.
This skirt wasn't that hard to draft as can be seen from my drafting plan.
The sewing sequence:
For the lining I followed the same sequence untill I got to the waist which I attached to the waist of the skirt after I gathered the side pieces. Turned in the lining, sewed down the lining to the zipper tape and hemmed my new skirt.
I am pleased with my new skirt as it makes its debut in my wardrobe and leaves my stash forever.
 ased on Ebay.
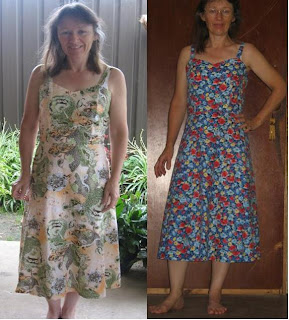
I would like to make this dress once more in a black fabric with appliqued flowers around the hem. The apricot/khaki dress had to be completely lined in cotton voile as it was a little sheer and when I made the blue floral dress I added 4cm flare to each quarter of the skirt and I moved the princess dart towards the armhole by 1.5cm so it would cover the bra strap.

 This is the very pretty Michelle.
 This is the sketch that Michelle drew for me to make her design from.
 This is a rough sketch I did so I would know how to draft the pattern. I made her block with no ease at the bust and waist and with 4cm ease in the hip area. When making her pattern from her block I left in the waist darts in the front and transferred the back darts into centre back shaping and the side seams. I also darted out some from the dropped back. I should have taken out more from the dropped back for a better fit (lesson learned)
 The dress was a satin fabric overlaid with the sheer organza. I used the satin fabric for the band on the overskirt. The draft wasn't too hard. The overskirt was a full circle with a cascade on either side of the opening, which was at side front. The dress was a basic shift style with a side zipper and the back cut out. The back was then laced up.
 The dress front.
 The dress back.
 The bead embroidered disc which I added over the closure. The centre of this disc is a button with a butterfly on it. It was a metal button that my son grinded the shank off, I glued the button to the fabric and then sewed the beads around it. Considering how much time I had the design turned out pretty good and Michelle was very happy.
 After measuring Ethan and comparing his measurements to the pattern I decided to start with a size 40. I knew there would be a lot of altering to get a good fit as his back, shoulders, arms and chest are large in comparison to his waist meaurement (his waist measurement is smaller than the size 36) also most of the muscle is in his back. I started with the vest which needed less fitting than the jacket.
 .3cm down to 1.3cm on each of the back


 The finished jacket.
 just commenced making my son Ethans outfit for his formal. He wants to wear a kilt so I ordered Folkwear Pattern 152. I have just commenced measuring and making it fit. Ethan does weightlifting and he is larger in the neck, shoulders, chest and arms and very skinny in the waist and hips so I have some adjustments to do.
